Getting Started
To log in, open a browser on your computer or mobile device. Next:
- Type roadsync.app in the URL field of your browser window. You’ll be directed to the RoadSync login page.
- Enter your user name and password* in the respective fields.
- Click or tap Sign In.
*Your user name and a temporary password were provided via email when your user account was created. If you’ve forgotten your password, select Forgot Password beneath the Sign In button.
To create an invoice:
- Log in to your RoadSync Checkout application.
- Ensure the Invoices tab is selected on the top menu bar.
- Click + New Invoice in the upper-right corner of the Checkout screen.
- On the Create Invoice screen, input the driver’s carrier information and the driver’s phone number or email, then click Save and Continue.
- Select the payment method, then begin building your invoice and detailing your charges.
- Click Confirm and Checkout, then Send to Recipient.
Your customer should now have the invoice in their text messages or email inbox.
Log in to your RoadSync Checkout application, and select the Invoices tab on the top menu bar. The status column on the left side of your screen displays icons that correlate to the invoice’s current status:
- A gray circle with an exclamation mark indicates that the invoice has not been sent to your customer.
- A green circle with a check mark indicates that your customer has successfully paid the invoice.
- A yellow circle with a paper airplane indicates that the invoice has been sent to your customer, but payment has not yet been completed.
- A red circle indicates that the payment was not successful. On the opposite side of the screen, you can click the red circle with a question mark to view the reason for the failed transaction.
To create a new work order, log in to RoadSync Checkout and ensure the Work Orders tab is select from the top menu bar. Then:
- Select + New Work Order Authorization.
- Enter the work order authorization information, including the reference number and carrier name, then select your work order template.
- Click Send Form to Recipient, then confirm the email address or phone number that you want the work order to be sent to and click Send.
Account Management
Log in to your RoadSync Checkout application, and select Admin from the top menu bar. Next:
- Select the User Accounts tile.
- Click Add New Teammate.
- Fill in the required fields by creating a unique username, providing the first and last name of the new user as well as their phone number, and selecting their role (either Employee or Company Admin).
- Assign a location, then select your preferred password option.
To change a password for another user, log in to the RoadSync application using your company admin username and password. Next:
- Click the Admin tab from the top menu bar.
- Select User Accounts from either the left-side menu or the tile grid.
- Find the user whose password you want to reset and select the three dots icon on the same row.
- Select Change Password.
- Choose to type in a new, temporary password or have the application generate a random one.
- Select Save. The user will receive an email with on-screen instructions for next steps.
To learn more about resetting a password, watch our video.
To cancel your account, please reach out to our dedicated customer support team. You can contact us via email at support@roadsync.com, call us at (866) 946-9586, or complete the form on our contact page. In the message area of the form, kindly specify that you would like assistance in canceling your account. Our team is here to assist you throughout the process and address any concerns you may have. Thank you for being a valued customer
Product Support
Before processing and accepting a digital fleet check, we recommend creating a work order authorization to protect your business against potential chargebacks. After you’ve completed the work order authorization:
- Log in to your RoadSync Checkout application and ensure Work Orders is selected from the top menu bar.
- Find the job you want to process a check for.
- On the same row, select the gray Invoice box.
- Follow the on-screen instructions to fill out the invoice information. If you already created a work order authorization, most of these fields will be pre-populated.
- Select Save and Continue, then upload optional photos of the job.
- From the Pay screen, select Fleet Check / Card, then select the fleet check type.
- Confirm the check number and select Confirm & Continue.
- Follow the on-screen instructions to complete the invoice details.
Set up your mobile card reader using our Quick Start Guide.
To add a new product or service:
- Log in as a company administrator and select Admin from the top menu bar.
- Select the Locations tile, then select Invoices: Products.
- Select Create Product from the top menu.
- Fill out the fields to create your product or service, then select Save.
If you’re a driver and you’ve received a RoadSync invoice via email or text message, follow these steps:
- Select Pay Invoice. A new browser window will open.
- Select Check, Fuel Card / Fleet Card, or Credit Card / Debit Card depending on how you want to pay.
- Follow the on-screen instructions.
- Select Pay.
Do not pair the card reader in Bluetooth settings.
- The reader will connect automatically after you create an invoice and select credit card payment.
- Open the box and plug in your mobile card reader. The light above the power button will turn blue when fully charged.
- Download the RoadSync Checkout app from the App Store (iOS 9 or higher required) and log in
- Once the card reader is fully charged, you will be able to take a payment.
- Open the box and plug in your mobile card reader. The light above the power button will turn blue when fully charged.
- Download the RoadSync Checkout app from the Google Play Store (Android 4.4 or higher required)
- Manually pair your card reader to your Android phone via bluetooth:
- Swipe down from the top of the screen
- Touch and hold Bluetooth
- Turn on the mobile card reader via side button
- Tap Pair new device on the phone
- Tap the CHB2204XXXXXX name that matches the device’s serial number
- Follow any on-screen instructions
- Login to the RoadSync Checkout app
- Once card reader is fully charged, you will be able to take a payment
No code is needed. Choose “Pair” to continue.
Your mobile card reader should charge for approximately 1 to 3 hours before first use.
iOS 9 or higher
Android 4.4 or higher
The battery should last for around 5000 magnetic swipe transactions or around 1000 chip or contactless transactions. Keep the reader turned off when not in use.
Use the included USB cord to plug into a matching charger. The card reader can be charged in a car.
The mobile card reader will take transactions using VISA, MasterCard, American Express or Discover cards. Fuel cards without those logos are not eligible at this time.
Your mobile card reader serial number is in the format CHB2204XXXXXX. You can find the serial number by the barcode on the cardboard sleeve or the lower left corner on the back of the reader.
iPhone: The card reader should be used with one phone at a time.
Android: Each card reader can be paired with only one phone at a time. If the user wants to connect the card reader to multiple phones, they would need to power cycle the card reader (or wait for the card reader to timeout and turn off on its own) before connecting it to the next phone in the same sitting. You should not have to disconnect from the previous phone as long as the reader powers off and back on.
You may be experiencing connection difficulties. Check to make sure your phone is connected to the Internet and the mobile card reader.
The card is declined. Please ask for another method of payment.
For more detailed help, contact RoadSync at support@roadsync.com or (866) 647-0373.
Your password needs to be 10 characters including 1 uppercase, 1 special character and 1 number.
Contact RoadSync support at (866) 647-0373.
Contact RoadSync support at (866) 647-0373.
Move your phone away from the reader and try again.
RoadSync does not offer an offline option at this time
Contact RoadSync support at (866) 647-0373.
Express Payments is a faster option for merchants who don’t require full invoicing or inventory management to receive payments.
Express Payment is activated per location.
Express Payment works on both websites and apps.
- Set the Amount: Effortlessly enter the total amount due, whether for parts, services, or any in-shop purchase.
- Payment Options: Provide customers with a seamless payment experience by either entering their credit card details directly or sharing a secure remote checkout link.
- Instant Invoicing: With a few clicks, generate an invoice on the spot, ensuring accurate record-keeping and facilitating prompt payment collection.
- Immediate Confirmation: Customers receive instant confirmation upon successful payment, allowing them to promptly receive their purchases or services.
Express Payment works only for Credit Card transactions, both present and not present, and for Remote Checkout.
Payer information is only collected for Remote Checkout payments or if the payer requests a receipt.
No, the settlement times for Express Payments invoices will remain consistent and unchanged from the previously determined timeframe.
You can easily search for invoices by entering the last four digits of the credit/debit card used for payment. This streamlined process helps you quickly locate specific invoices as needed.
If you have Express Payments enabled for multiple locations, you can easily select the desired location from a dropdown menu during invoice creation. However, if only one location has Express Payments enabled, the dropdown menu won’t appear, simplifying the process for you.
Yes, convenience fees can be toggled on and off.
PayLink is a customized hosted payment page provided by RoadSync. This page offers secure checkout capabilities for business websites without the need for building their own payment gateways. When customers make a purchase, they are directed to this external page to enter their payment information, ensuring a seamless and secure transaction process.
PayLink is activated per company and may support multiple locations.
- Send the Payment Link: Send your customers your custom PayLink url. They click on it to start paying based on the invoice or info they got.
- Secure Payment: Your customers fill in their payment details on the safe PayLink page. They pick how they want to pay for an easy time.
- Instant Confirmation: Once they pay, your customers get an email receipt right away. This keeps things clear and smooth.
- Easy Reconciliation:Our system works smoothly with your customer’s payer account. This makes it simple to match up payments and keep track of receipts online.
PayLink can be added to invoices, websites, QR codes, emails, and more.
Payment methods available are all those set in the “remote checkout” settings.
No, settlement times for PayLink invoices will remain consistent and unchanged from the previously determined timeframe.
Convenience fees are enabled by default but can be adjusted.
Taxes are not enabled by default, assuming they would be handled by other invoicing systems.
All invoice creations are protected by Captcha to block bots and maintain data integrity.
All credit card transactions with PayLink should have 3D Secure turned on.
The payer receives a receipt via email/sms and can view payment details to see a PDF receipt. If the payer logs into the driver.roadsync.app or payer.roadsync.app, the receipt will be saved there too.
3D Secure is an additional layer of security for online card payments. It requires customers to authenticate themselves with their card issuer before completing a transaction. This is typically done by entering a one-time password received via text message or app.
Enabling 3DS can help reduce the risk of fraudulent transactions and chargebacks, providing added security for both you and your customers.
Yes, with 3DS, certain chargeback liabilities may shift from the merchant to the card issuer. However, this isn’t always the case and depends on various factors, including card network policies. While 3DS adds an extra layer of protection, merchants should remain vigilant and address disputes promptly.
No, 3DS primarily prevents chargebacks related to fraudulent card use, but it doesn’t cover all scenarios. While it greatly reduces the risk of fraudulent chargebacks, other reasons like non-receipt of goods or service dissatisfaction could still lead to chargebacks initiated by the cardholder.
- The customer initiates a payment on RoadSync via a RoadSync Remote Checkout link.
- The RoadSync platform sends a request to the card issuer to verify the cardholder’s identity.
- The card issuer prompts the customer to provide additional authentication, such as a one-time password sent to their mobile phone, or biometric data like a fingerprint or facial recognition.
- The customer provides the required authentication information.
- The card issuer verifies the information and sends a response back to RoadSync, either approving or declining the transaction.
For transactions through RoadSync Checkout, 3DS will only be prompted through the Remote Checkout and PayLink feature. 3DS is available for most cards used across RoadSync. However, there are certain cases to consider:
- Card Types: 3DS may not be available for international cards, prepaid cards and certain corporate expense cards.
- Issuer Variability: For Mastercard (MC) and Visa cards, the availability of 3DS can vary based on the issuer’s decision. However, Discover and American Express (Amex) cards always have 3DS available.
In most cases, your customers cannot opt-out of 3DS. However, some banks may offer the option to opt-out of 3DS for certain transactions or card types.
RoadSync does not charge any additional fees for enabling 3DS if you are in the Professional or Enterprise tier program.
No, the 3DS prompt seen by customers is controlled by the card issuer and not RoadSync. Customization options for the 3DS authentication dialog are determined by the policies and branding guidelines of the respective card issuer.
3DS is designed to enhance security for online payments, but there are scenarios where it may not activate:
- Contactless Payments at Point of Sale: While 3DS excels in securing online payments, it may not activate for in-person contactless transactions at the point of sale.
- Trusted Beneficiaries: If a customer frequently transacts with a trusted vendor and marks them as a trusted beneficiary, 3DS might not activate for subsequent transactions to enhance user convenience.
- Recurring Transactions: For subscription-based services or recurring payments, 3DS may not activate after the initial authentication to provide a smoother experience for regular transactions.
- Low-Value Transactions: In some cases, 3DS may not be triggered for low-value transactions to balance security with user experience, ensuring a hassle-free checkout for smaller purchases.
- Secure Corporate Payments: Certain corporate cards may be exempt from 3DS authentication if they are deemed secure and low-risk, facilitating efficient business transactions while maintaining security standards.
If 3DS does not activate for a transaction and the merchant trusts the customer, alternative payment methods can be considered:
- Create a New Invoice: Merchants can create a new invoice with a different payment method, such as ACH or Fleet Check, without using remote checkout or sending a paylink.
- Input Customer’s Payment Information: Merchants can manually input the customer’s payment information to process the transaction securely.
There could be several reasons why a transaction failed despite having 3DS turned on:
- Authentication Failure: The authentication process required by 3DS might have failed, possibly due to incorrect input of the one-time password or other authentication factors.
- Technical Issues: Technical issues on either the merchant’s or the card issuer’s end could have caused the transaction to fail. This could include server issues, network problems, or system errors.
- Card Issues: The customer’s card might have expired, been canceled, or reached its limit, preventing the transaction from being processed successfully.
- Risk Assessment: The transaction might have been flagged as high-risk by the card issuer or the 3DS authentication system, leading to its rejection for security reasons.
Download Center
Mobile Reader Quick Start Guide
Get simple, step-by-step instructions to set up your mobile card reader and start accepting payments.
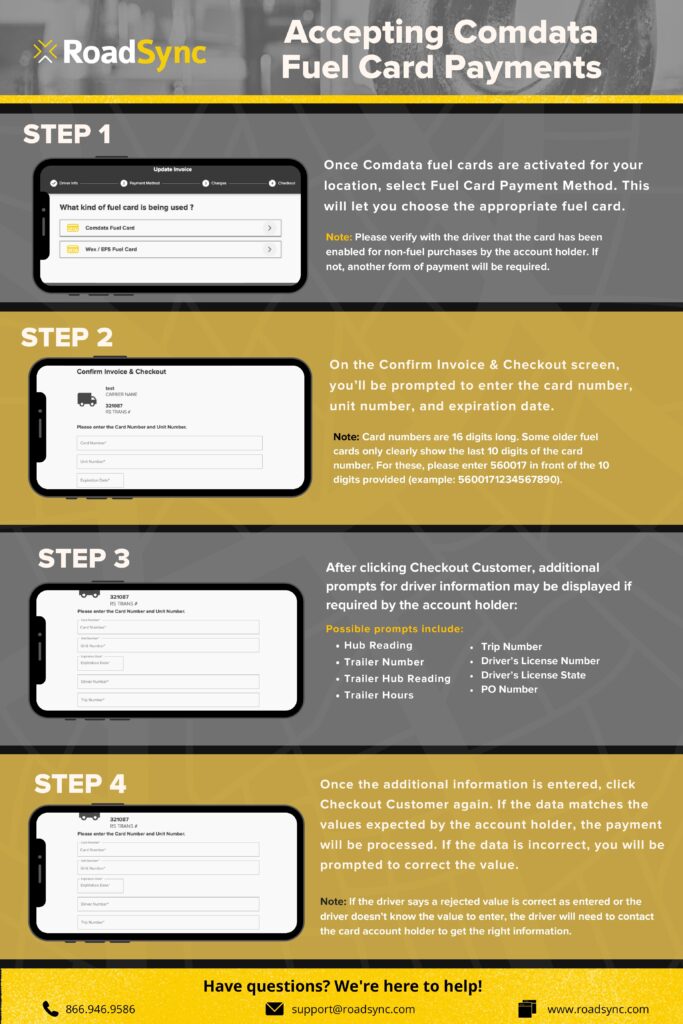
How to Pay with Comdata Fuel Cards
RoadSync Checkout makes it easy to pay and get paid in a variety of ways. Read our guide to learn how to pay with a Comdata fuel card.
Fight Chargebacks
With work order authorizations and detailed invoices, RoadSync Checkout makes it easy to fight chargebacks. Learn more in our guide.